


AI agents can already write code, pull insights from reports, and talk like people but when you need them to actually do something in your app, they get stuck. That’s because every service, database, or API needs its own custom connector, which takes time to build and breaks easily.
Model Context Protocol (MCP) fixes this by giving you one simple layer to connect your Express or MERN app to AI agents in minutes no custom code needed. With MCP, your AI can safely and reliably access your routes, databases, and external tools. As a SaaS CTO facing growing demands for AI features alongside fragile APIs and security worries, MCP lets you launch real AI-driven functions very quickly.
What Is Model Context Protocol (MCP)?
Model Context Protocol (MCP) is an open standard developed by Anthropic, the company behind Claude. While it may sound technical, but the core idea is simple: give AI agents a consistent way to connect with tools, services, and data no matter where they live or how they’re built.
As highlighted in Forbes, MCP is a big leap forward in how AI agents operate. Instead of just answering questions, agents can now perform useful, multi-step tasks like retrieving data, summarizing documents, or saving content to a file.
Before MCP, each of those actions required a unique API, custom logic, and developer time to glue it all together.
.png)
API VS MCP:
Architecture:
Traditional APIs use a monolithic architecture one large system that handles everything (e.g., user logins, data, payments) in a single unit. MCP (Modern API Platform), on the other hand, uses microservices small, independent services, each handling a specific task (e.g., one for logins, another for payments).
Scalability:
Traditional APIs are difficult to scale you have to scale the entire system at once, even if only one part needs more resources. MCP is easy to scale you can scale individual services as needed without affecting the rest.
Management:
Traditional APIs require manual management developers have to handle tasks like security and routing themselves, which takes time. MCP is automated with API gateways handles security, routing, and other tasks automatically, saving time and effort.
Flexibility:
Traditional APIs are less flexible making changes can affect the entire system, so updates are risky and need careful planning. MCP is highly flexible you can update one service without impacting others, making changes faster and safer.
Deployment:
Traditional APIs require deploying the entire application even small updates mean redeploying everything, which can cause downtime. MCP lets you deploy updates to individual services you can update one part without touching the rest, reducing downtime.
With MCP, it’s plug-and-play. Agents can send structured requests to any MCP-compatible tool, get results back in real time, and even chain multiple tools together — without needing to know the specifics ahead of time.
In short: MCP replaces one-off hacks with a unified, real-time protocol built for autonomous agents.
Why SaaS Should Consider MCP?
For SaaS, MCP Server is a big deal. Right now, most SaaS platforms have a fixed list of integrations, meaning customers have to wait for you to build the connections they need. With MCP, the game changes. Instead of shipping new integrations one by one, SaaS products can allow users to connect to any service dynamically. That’s a whole new level of flexibility.
1. Dynamic & Flexible Integrations: MCP lets AI agents easily connect to different services in real time. This means users can link up with any service on the fly, making the system more adaptable and customizable.
2. Standardized Context Sharing: With MCP, apps share context in a standardized way. This turns them into proactive agents that streamline workflows and save setup time, even when apps get updated.
3. Improved User Experience: MCP makes it super easy for users to integrate with AI tools, creating a smoother, more intuitive experience with their favorite AI assistants.
4. Enhanced AI Capabilities: By connecting AI models to external systems, MCP unlocks the ability to perform complex tasks and automate workflows, taking AI-driven applications to the next level.
5. Increased Data Access & Utilization: MCP allows AI agents to tap into data from various SaaS apps, enabling smarter, context-aware solutions that make AI even more helpful.The pain of building your own MCP Server
Claude + MCP + Express: What the Integration Looks Like
Here's the real-world architecture for MCP inside your Node.js or MERN SaaS platform:
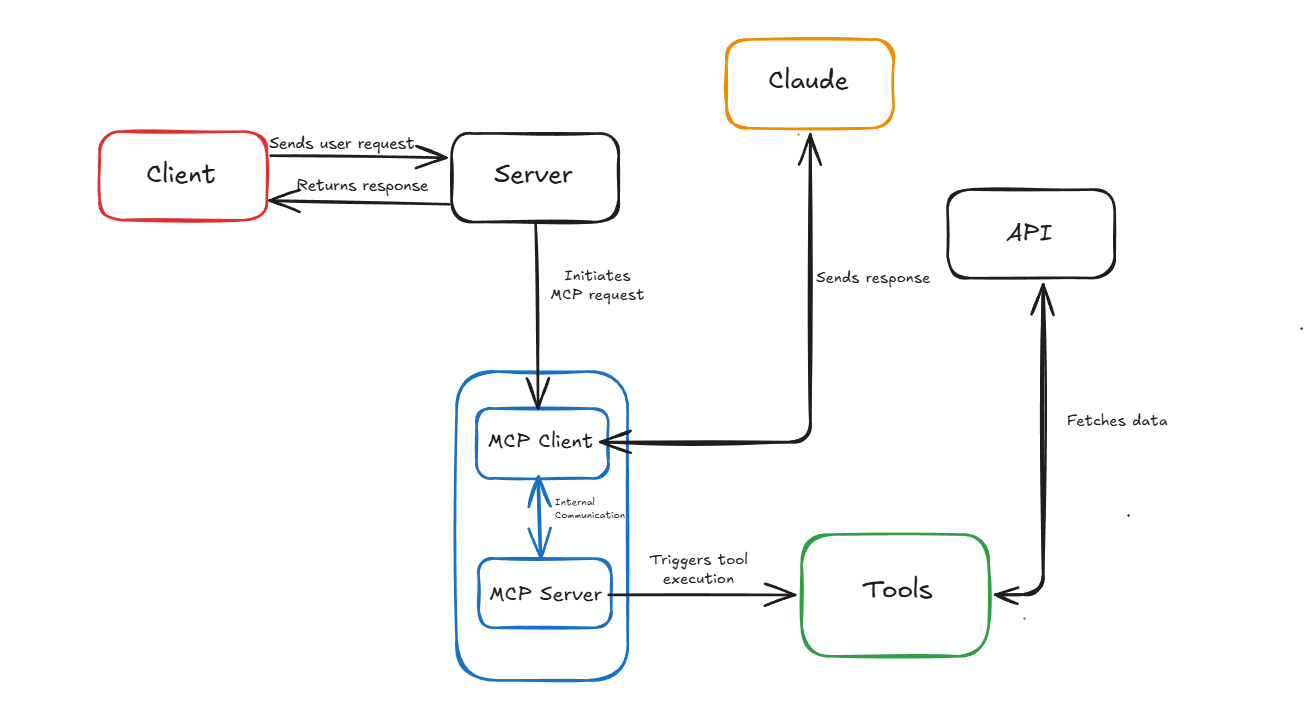
Here is a look at how the above architecture works under the hood:
MCP Servers
An MCP server is like a smart adapter for a tool or app. It knows how to take a request from an AI (like “Get today’s sales report”) and translate it into the commands that tool understands.
For example:
- A GitHub MCP server might turn “list my open pull requests” into a GitHub API call.
- A File MCP server might take “save this summary as a text file” and write it to your desktop.
- A YouTube MCP server could transcribe video links on demand.
MCP servers also inform the AI about the tools and capabilities available (tool discovery), interpret and execute its commands, format the results into a structure the AI can understand, and handle any errors by providing meaningful feedback.
MCP Clients
On the other side, an MCP client lives inside the AI assistant or app (like Claude or Cursor). When the AI wants to use a tool, it goes through this client to talk to the matching server.
For example:
- Cursor can use a client to interact with your local development environment.
- Claude might use it to access files or read from a spreadsheet.
The client handles all the back-and-forth — sending requests, receiving results, and passing them to the AI.
The MCP Protocol
The MCP protocol is what keeps everything in sync. It defines how the client and server communicate — what the messages look like, how actions are described, and how results are returned.
It’s super flexible:
- Can run locally (e.g., between your AI and your computer’s apps)
- Can run over the internet (e.g., between your AI and an online tool)
- Uses structured formats like JSON so everything stays clean and consistent
Thanks to this shared protocol, an AI agent can connect with a new tool even one it’s never seen before and still understand how to use it.
Tools
The last part of the puzzle is the services the actual tools or data sources the AI wants to use.
These could be:
Local: files on your device, a folder, an app running locally
Remote: cloud databases, SaaS tools, web APIs
MCP servers are the gateway to these services, handling access securely and reliably.
Server
The server acts as a bridge between the client, Claude, and MCP tools receiving user requests, routing them via the MCP client to the right service, and returning structured responses. It ensures smooth communication across the AI and tool ecosystem.
How to setup an MCP Server
Let’s walk through the core steps in detail:
Initialize Your MCP Microservice
Create a new Node.js project:
mkdir mcp-servercd
mcp-server
npm init -y
npm install fastmcp zod express dotenv
You can start from scratch or use fastmcp, which includes:
- Built-in tool registration
- Schema validation
- Claude compatible interface
- Simple server setup with Express
Structure your folders like this:
/mcp-server
├── .env
├── index.ts
└── tools
	└── super-simple.ts
Keep the MCP server decoupled from your main app this ensures clean versioning, secure exposure, and fast deployments.
Creating an MCP client on an express server
// examples/with-express/src/super-simple.ts
import express from 'express'
import cors from 'cors'
import { MCPClient, mcpTool } from 'mcp-express-adapter'
import { z } from 'zod'
// Create Express app
const app = express()
app.use(cors())We initialize the Express app and enable CORS, allowing the server to accept requests from different domains important for frontend-backend communication.
Registering Tools
interface ToolImpl<T = any> {
  name: string // Tool name
  description: string // Tool description
  inputSchema: {
    // JSON Schema for the tool's input
    type: 'object'
    properties: Record<string, any>
    required?: string[]
  }
  handler: (
    args: T,
    context?: {
      headers?: Record<string, string> // Request headers accessible here
      [key: string]: any
    },
  ) => Promise<{
    content: Array<
      | { type: string; text?: string }
      | { type: string; data?: string; mimeType?: string }
    >
    isError?: boolean
  }>
}
// examples/with-express/src/tool-example.ts
import { mcpTool } from 'mcp-express-adapter'
import { z } from 'zod'
/**
* Example 1: Tool with an output schema for complex data
*/
const weatherTool = mcpTool({
name: 'get_weather',
description: 'Get the current weather for a location',
schema: z.object({
location: z.string().describe('The location to get weather for'),
}),
// Define the output schema for structured data
outputSchema: z
.object({
temperature: z.number().describe('Current temperature in °F'),
condition: z.string().describe('Weather condition (e.g., Sunny, Rainy)'),
humidity: z.number().describe('Humidity percentage'),
location: z.string().describe('The location this weather is for'),
})
.describe('Weather information for the requested location'),
handler: async (args) => {
// args.location is fully typed as string
return {
temperature: 72,
condition: 'Sunny',
humidity: 45,
location: args.location,
}
},
})
/**
* Example 2: Tool without an output schema for simple string responses
*/
const greetingTool = mcpTool({
name: 'greeting',
description: 'Get a personalized greeting',
schema: z.object({
name: z.string().describe('The name to greet'),
formal: z.boolean().optional().describe('Whether to use formal language'),
}),
// No outputSchema needed for simple string responses
handler: async (args) => {
// When no outputSchema is provided, you must return a string
return args.formal
? `Good day, ${args.name}. How may I be of service?`
: `Hey ${args.name}! How's it going?`
},
})
// non typesafe tool:
// javascript ready
const nonTypesafeTool = {
name: 'search_web',
description: 'Search the web for information',
inputSchema: {
type: 'object',
properties: {
query: { type: 'string', description: 'The search query' },
limit: {
type: 'number',
description: 'Maximum number of results to return',
},
},
required: ['query'],
},
handler: async (args) => ({
content: [
{
type: 'text',
text: `Search results for "${args.query}": Results here...`,
},
],
isError: false,
}),
}
export { weatherTool, greetingTool, nonTypesafeTool }
We define a tool named get_weather using mcpTool. It expects a location as input and responds with a weather message. The zod schema ensures that the input is valid.
Initialize MCP Client
const mcpClient = new MCPClient({
  endpoint: '/mcp',
  tools: [weatherTool],
  serverName: 'demo-server',
  serverVersion: '1.0.0',
})
An MCPClient is created with the endpoint , and the weather tool is registered. This client handles tool registration, versioning, and SSE (Server-Sent Events) support for real-time communication.
Mount the MCP Middleware
We mount the MCP middleware at the /mcp route. This exposes endpoints such for real-time interaction with the tool.
app.use('/mcp', mcpClient.middleware())Start the Server
const PORT = process.env.PORT || 3000
app.listen(PORT, () => {
  console.log(`Super Simple MCP Server running!`)
  console.log(`Connect at: http://localhost:${PORT}/mcp/sse`)
})
Finally, the server listens on the specified port (default: 3000), and logs the endpoint for connecting to the server-sent events stream.
In the terminal make sure the server is running:
MCP Client created with the following configuration:
- Endpoint: /mcp
- Server: my-mcp-server v1.0.0
- Tools: get_weather, calculator, generate_list, greeting
MCP Server running on port 3000
Connect at: http://localhost:3000/mcp/sse
Debug mode: enabled will show debug logs, to disable set NODE_ENV=production
Testing out the MCP server in Claude desktop
Now that your MCP server is registered and running, you need to connect it to Claude Desktop:
Enabling Developer Mode in Claude Desktop
- Open Claude Desktop application
- Access Settings: Click on your profile icon in the top-right corner and select "Settings"
- Enable Developer Mode:
- Scroll down to find the "Developer" section
- Toggle the "Developer Mode" switch to ON
- This will expose additional developer options in the application
Viewing and verifying the Claude Desktop Configuration
- Locate the Claude Desktop Config File:
- On Windows: %APPDATA%\\Claude\\claude_desktop_config.json
- On macOS: ~/Library/Application Support/Claude/claude_desktop_config.json
- On Linux: ~/.config/Claude/claude_desktop_config.json
- Open the Configuration File with any text editor
- Verify Your MCP Server Registration:
- Look for a section labeled "servers" in the JSON file
- Confirm that your server is listed with the correct URL (typically http://localhost:3000)
- The entry should be changed and it should look something like this:
{
  "mcpServers": {
    "localMcpServer": {
      "command": "npx",
      "args": [
        "-y",
        "mcp-express-adapter",
        "--host",
        "http://localhost:3000/mcp/sse"
      ]
    }
  }
}
Then Restart Claude desktop and you'll be able to see the MCP tools within few seconds
Granting MCP Access in Claude Desktop
- Start a New Conversation in Claude Desktop
- Type a Message that would require access to your MCP server
- Access Permission Dialog: Claude will prompt you to allow access to the MCP server
- Grant Permission: Click "Allow" to let Claude access your MCP server
- Remember Permission: You can select "Remember this decision" to avoid future prompts
.png)
.png)
Multiple MCP client on same Express server:
// examples/with-express/src/multiple-mcp-clients.ts
import express from 'express'
import cors from 'cors'
import { MCPClient, mcpTool } from 'mcp-express-adapter'
import { z } from 'zod'

// Create Express app
const app = express()
app.use(cors())

// Define weather tool using mcpTool helper
const weatherTool = mcpTool({
  name: 'get_weather',
  description: 'Get the current weather for a location',
  schema: z.object({
    location: z.string().describe('The location to get weather for'),
  }),
  // you can define typesafe output schema..
  outputSchema: z.object({
    farenheight: z.number().describe('The temperature in farenheight'),
    celsius: z.number().describe('The temperature in celsius'),
  }),
  handler: async (args) => {
    return {
      farenheight: 72,
      celsius: 22,
    }
  },
})

// Define calculator tool using mcpTool helper
const calculatorTool = mcpTool({
  name: 'calculate',
  description: 'Calculate the result of a mathematical expression',
  schema: z.object({
    expression: z.string().describe('The mathematical expression to evaluate'),
  }),
  handler: async (args) => {
    return `Result: ${eval(args.expression)}`
  },
})

// Define time tool using mcpTool helper
const timeTool = mcpTool({
  name: 'get_time',
  description: 'Get the current time, optionally for a specific timezone',
  schema: z.object({
    timezone: z
      .string()
      .optional()
      .describe('The timezone to get time for (optional)'),
  }),
  handler: async (args) => {
    return `Current time${args.timezone ? ` in ${args.timezone}` : ''}: ${new Date().toLocaleString()}`
  },
})

// Create first MCP client with weather tool
const weatherClient = new MCPClient({
  endpoint: '/weather-mcp',
  tools: [weatherTool],
  serverName: 'weather-mcp-server',
  serverVersion: '1.0.0',
})

// Create second MCP client with calculator tool
const calculatorClient = new MCPClient({
  endpoint: '/calculator-mcp',
  tools: [calculatorTool],
  serverName: 'calculator-mcp-server',
  serverVersion: '1.0.0',
})

// Create third MCP client with time tool
const timeClient = new MCPClient({
  endpoint: '/time-mcp',
  tools: [timeTool],
  serverName: 'time-mcp-server',
  serverVersion: '1.0.0',
})

// Mount MCP routers BEFORE global JSON parser
app.use('/weather-mcp', weatherClient.middleware())
app.use('/calculator-mcp', calculatorClient.middleware())
app.use('/time-mcp', timeClient.middleware())

// Apply global JSON parser AFTER agent routes
app.use(express.json())

// Start the server
const PORT = process.env.PORT ? parseInt(process.env.PORT) : 3000
app.listen(PORT, () => {
  console.log(`Multiple MCP Servers running on port ${PORT}`)
  console.log(`Weather MCP: http://localhost:${PORT}/weather-mcp/sse`)
  console.log(`Calculator MCP: http://localhost:${PORT}/calculator-mcp/sse`)
  console.log(`Time MCP: http://localhost:${PORT}/time-mcp/sse`)
})
This TypeScript script sets up an Express server that hosts three different AI-powered tool interfaces using the mcp-express-adapter library. Each tool weather, calculator, and time is wrapped in an MCP client and served at its own dedicated endpoint. The weather tool returns temperature data, the calculator tool evaluates basic math expressions, and the time tool provides the current time with optional time zone support. These tools are registered as middleware on their respective routes (/weather-mcp,/calculator-mcp, and /time-mcp) before applying the global JSON parser to ensure proper request handling. Finally, the server listens on port 3000 (or a specified environment port) and logs the available tool URLs, making it easy to test and interact with each MCP service individually.
Troubleshooting Common Issues
Configuration Not Loading
- Verify JSON Syntax: Use a JSON validator to check for errors.
- Permissions: Ensure proper read/write permissions for the configuration file.
- Correct Path: Double-check the file’s location.
API Key Problems
- Ensure the API key is accurately copied without extra spaces.
- Verify the key’s status in the Brave Search dashboard.
Node.js Issues
- Check installation: node --version.
- Reinstall Node.js if necessary.
Essential MCP Automation Workflows
Everyday Helpers
These automations handle the small but repetitive chores you face every day. MCP can sort your downloaded files into folders, clean up your inbox by archiving or labeling messages, and move documents to their proper locations. Once you set these up, they run in the background, so you no longer waste time on basic file and email management. You start each morning with an organized workspace and can focus on work that really matters.
Quick Wins (Under 10 Minutes)
These are simple scripts you can build and deploy in under ten minutes. For example, you might create a tool that generates a daily status report, renames a batch of files, or sends a predefined email template. Each one takes almost no time to set up but immediately boosts your productivity. They’re perfect for squeezing out quick gains when you don’t have hours to spare.
Workflow Boosters
Workflow boosters tackle your core, repetitive tasks so you stay in “deep work” mode. MCP can automate actions like committing code to Git, spinning up or tearing down Docker containers, and generating UI mockups on demand. Instead of interrupting your focus to run shell commands or open design tools, you issue a simple MCP command. This frees you to think strategically, solve complex problems, and complete meaningful work without friction.
Research & Summaries
These tools gather and condense information for you. MCP can scrape data from websites like prices, news articles, or product listings and pull statistics from databases. It can also summarize long documents or meeting transcripts into concise bullet points. Rather than manually copying, pasting, and skimming pages of text, you get key insights delivered instantly. This saves hours of tedious work and helps you make informed decisions faster.
Message Automation
Message automation covers drafting, sending, and managing communications across channels. With MCP you can generate personalized follow-up emails, triage incoming chats by labeling or routing them, and even schedule WhatsApp reminders. Each message template runs automatically based on triggers you define like a new database entry or a calendar event. This ensures consistent outreach, keeps stakeholders informed, and prevents you from typing the same messages over and over.
Creative Assist
Creative assist tools give your design and media teams a jump start. MCP can auto-generate wireframes in Figma based on simple prompts, batch-resize or watermark images, and set up basic 3D scenes in Blender. Instead of spending time on repetitive setup tasks, designers and artists can dive straight into creative problem-solving. These automations reduce manual effort, speed up the iteration cycle, and let your team focus on the vision rather than the mechanics.
.png)
Conclusion
Model Context Protocol (MCP) lets your AI actually do things in your app instead of just talking about them. With MCP, you replace many fragile, custom connectors with one simple bridge. You can hook up Claude (or any AI) to your Express or MERN backend quickly.
MCP is more than a new integration style it’s the key to faster feature launches, easier onboarding, and AI features your users can turn on themselves.
Ready to Try MCP in Your SaaS?
If you’re a SaaS CTO ready to move fast with AI, let’s get started:
- Book a Free Call – Talk with our engineers about your idea.
- Live Workshop – We’ll help you add an MCP endpoint to your code right away.
- Pilot Project – Connect Claude to one real workflow and see the benefits.
👉 Book a Call with Ionio’s AI Team and bring real AI power to your product.


.png)
.png)