👋 Introduction
Imagine you are a company (Ionio) which helps other companies or clients to make AI-Powered SaaS products and you have so many clients meetings scheduled. Most of these meetings are first time interaction with client where they come up with their project idea or a problem statement and they want to discuss how they can solve that problem and how to convert their idea into an actual project with your help. There is a meeting description with you for every meeting which have information about idea and client.
Now you as a good CEO (Rohan) or founder want to get some information about client, their organization and idea before the meeting to get the context of meeting so that you can make good impression in meeting and get your solution ready before meeting and also you want to create a small project proposal if in case you make the deal 😎.
Doing this manually will take a lot of time as you have so many client requests and meetings and your workforce is small so you don’t have anyone for this task and the task itself is also repetitive and that's where Langchain and Agents come in – they're here to change the game.
By using AI technology like natural language processing (NLP), Langchain lets us create clever little helpers called agents. These agents can take care of all sorts of tasks, freeing us up to focus on the important stuff.
In this blog, we will first learn about langchain and agents in detail with code examples and then we will create our own custom agent for the above scenario So let’s get started! 🚀
We will create an agent which will do following tasks:
- Get information about a prospect & their idea from internet when a call is booked
- Find possible solution about idea and how to convert that idea in an actual product from internet
- Create a professional project proposal from given idea, client information and solution which includes other information like tech stack, timeline, project link etc
- Save the project proposal as notion document or word document
💡How to get code?
You can get all the code discussed here from LLM agent for meeting automation repository.
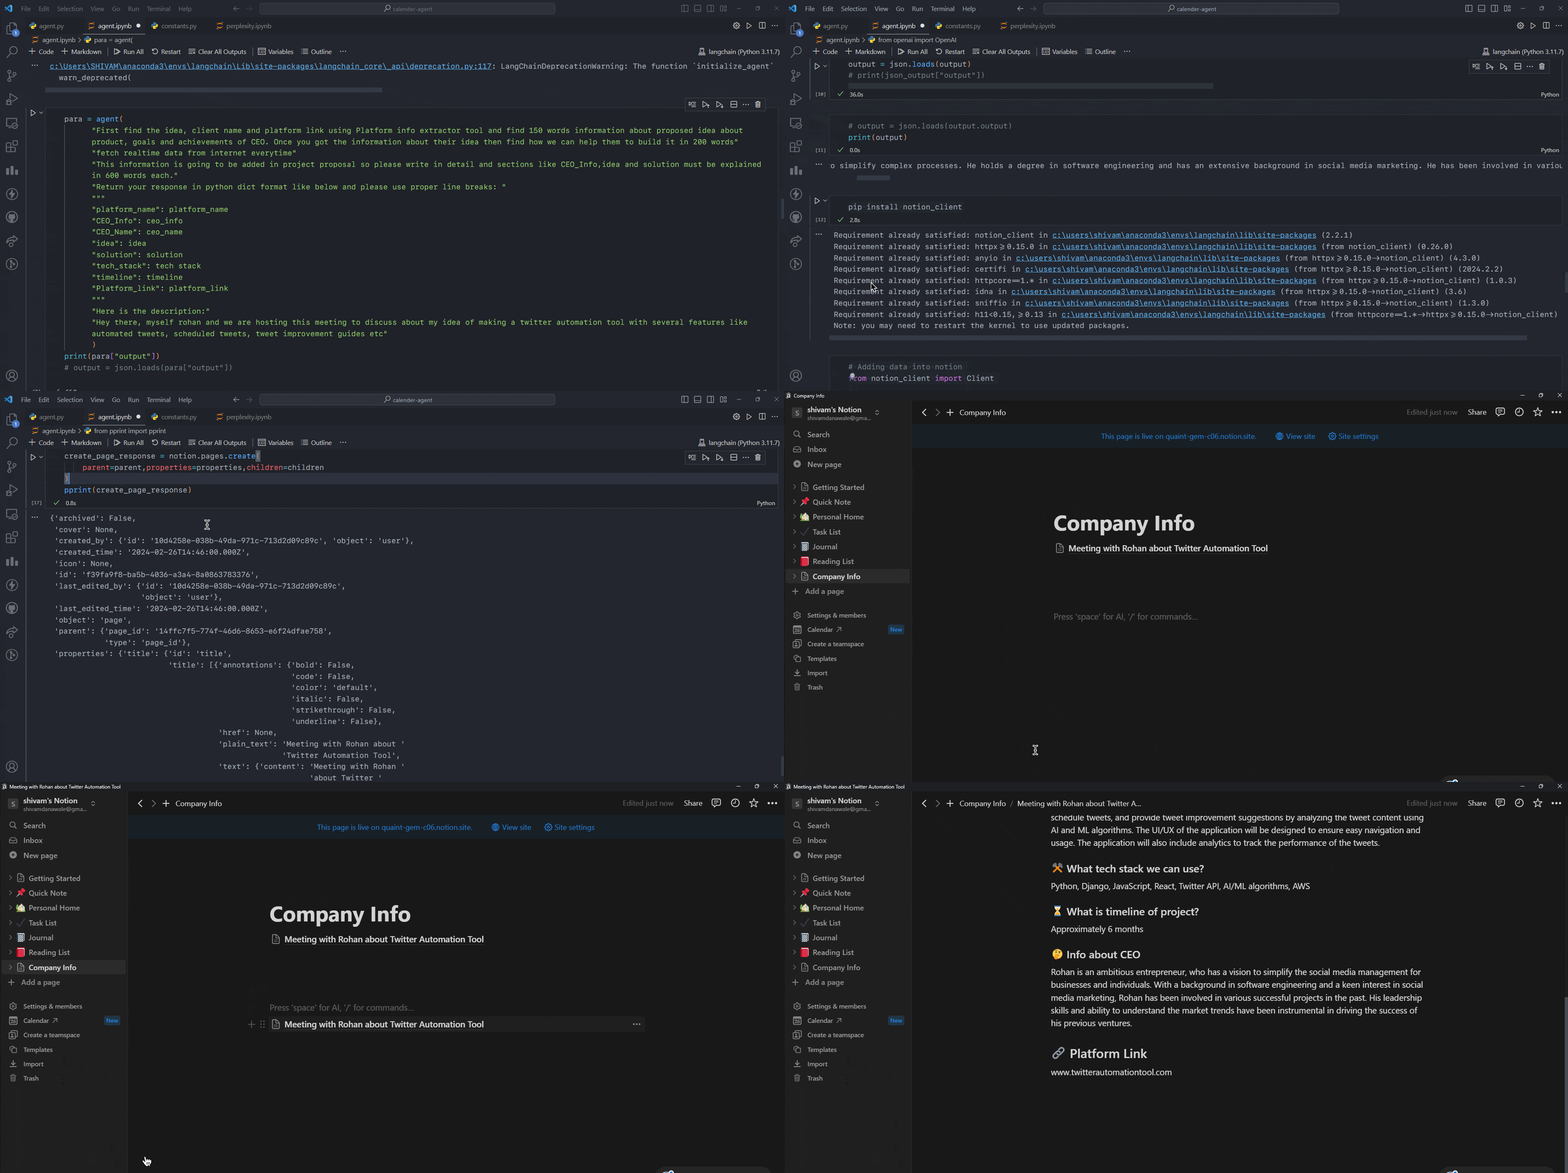
Here is the sneak peek of our agent 👀
🔗 What is Langchain?
Nowadays everyone want to integrate AI models in their existing applications or want to make products using AI and LLMs but many of these models are limited to specific amount of data as they are trained on historical data so they don’t have access to latest data or data from other models. There are different models trained on different datasets and if you want to combine the functionality of these models for specific tasks you were not able to do it. To solve this problem, Harrison Chase launched a framework called Langchain in October 2022 as an open source project and it became very popular in very small amount of time because of its robustness, performance and features.
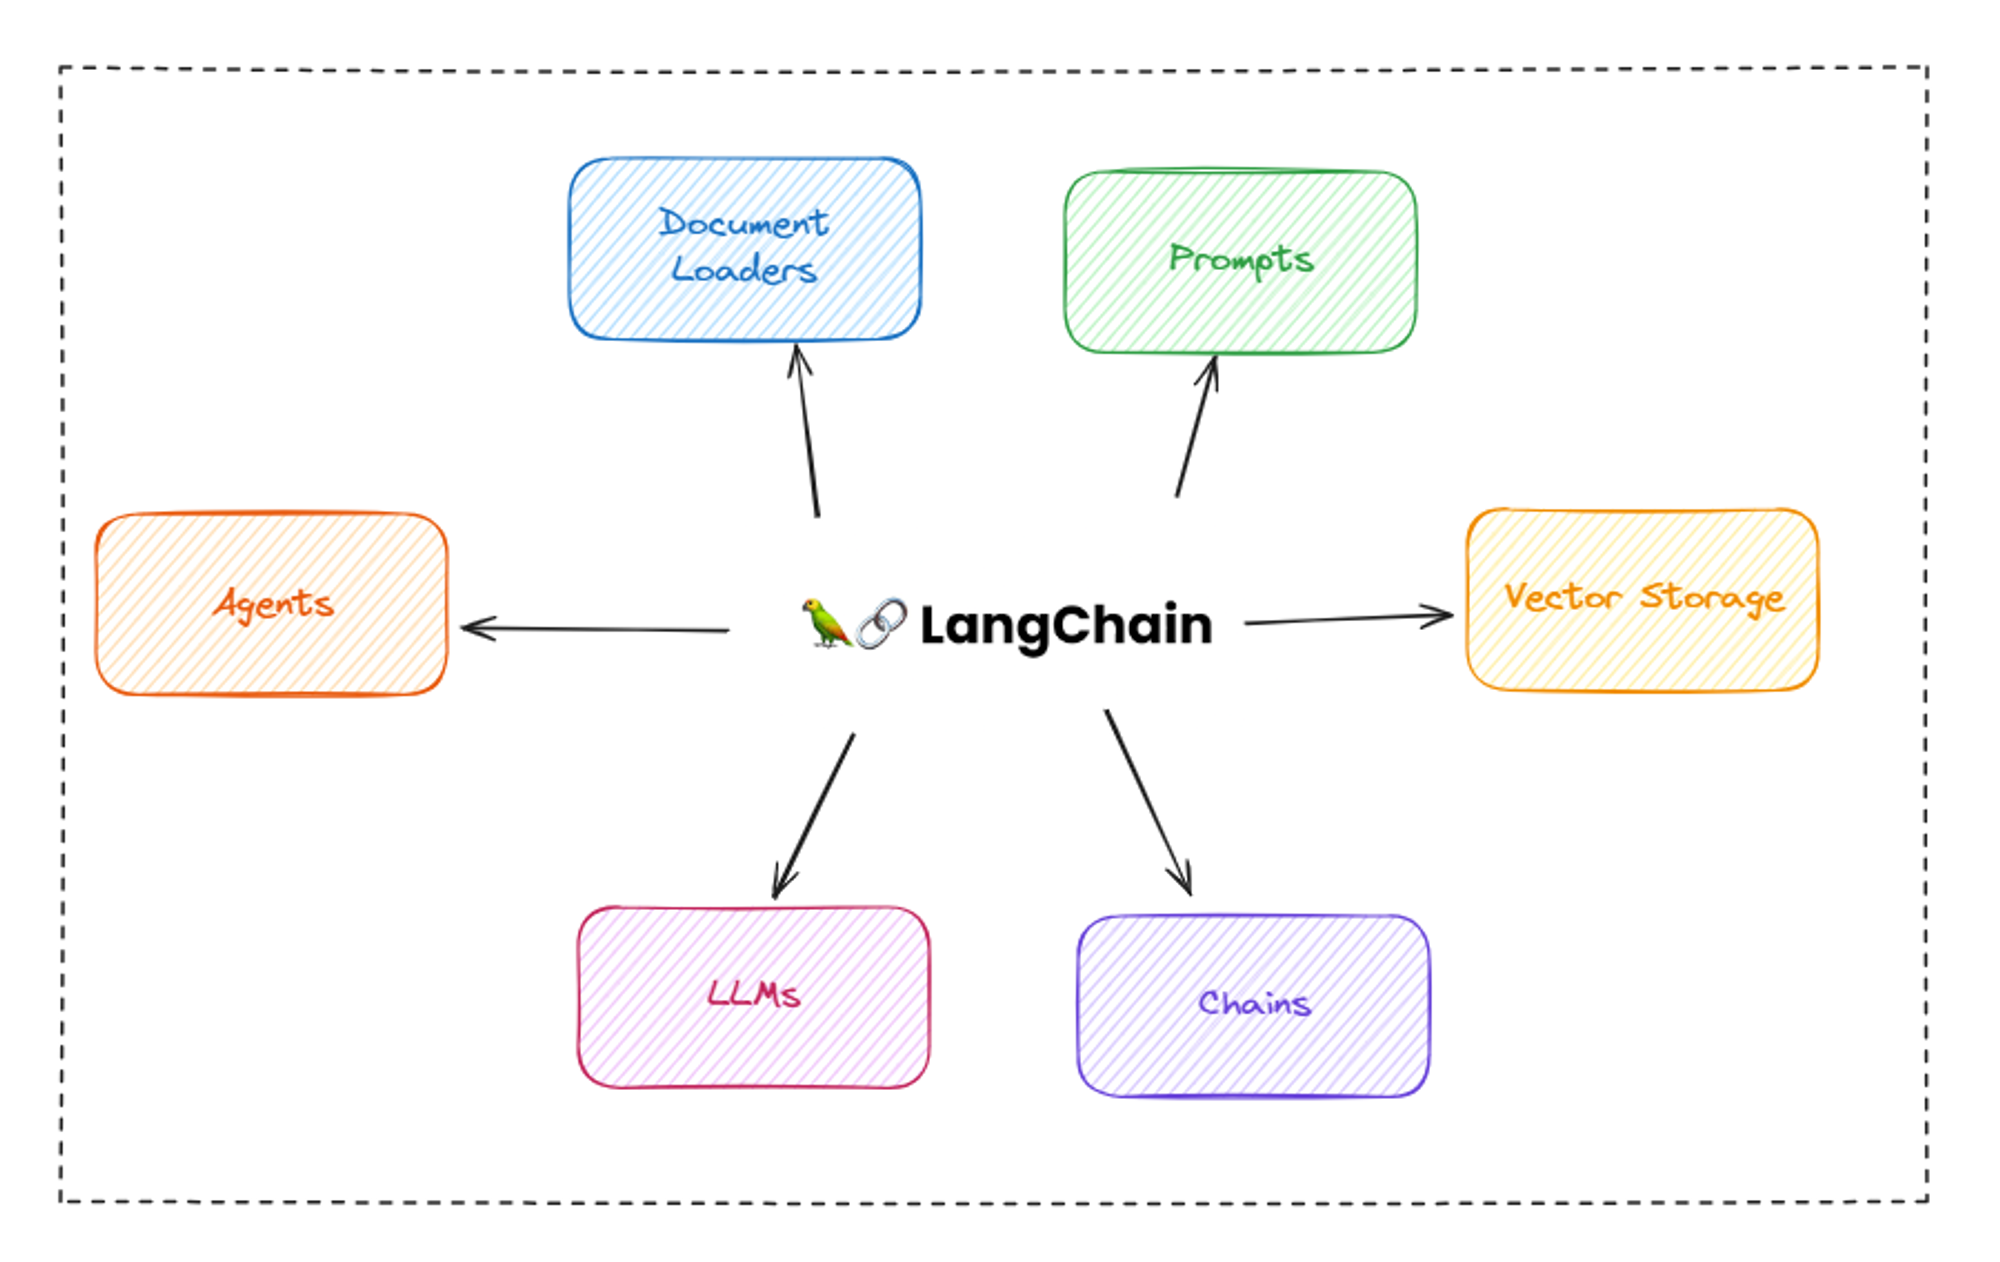
LangChain is an open source framework that lets software developers with AI combine large language models with other external components to develop LLM-powered applications. The goal of LangChain is to link powerful LLMs, such as OpenAI's GPT-3.5 and GPT-4 or meta’s Llama2, to an array of external data sources to create and reap the benefits of natural language processing (NLP) applications.
Let’s create our first chain with LangChain
In langchain, chain is a series or chain of different components which can connected with each other and can pass input and output to process data. These chains are created by one or more LLMs. For example, if you want to generate some data using LLM and then you want to use that output as an input for another LLM then you can create a chain for this purpose. There are several types of chains in langchain. Some of them are:
- Sequential Chain: A series of chains that are executed in a specific order. There are two types of sequential chains: SimpleSequentialChain and SequentialChain where SimpleSequentialChain is the simplest form of chain
- LLM Chain: The most common chain, which comes in different forms to address specific challenges. Some commonly used types of LLM chains include the Stuffing chain, the Map-Reduce chain, and the Refine chain.
- Translation Chain: Asks an LLM to translate a text from one language to another
- Chatbot Chain: Creates a chatbot which can answer questions and generate text.
In this blog, we will only talk about SimpleSequentialChain and SequentialChain.
We use SimpleSequencialChain when we have only one input and single output in a chain. For example, we have a cuisine and we want to generate restaurant name from given cuisine name and from that name we want to generate 10 dishes to add in menu.
As we can see here one task is dependent on other and here is where we will create our first chain so let’s code it.
First install openai and langchain modules
Let’s first setup our LLM, we will use GPT-3.5 Turbo model for this tutorial. Get your api key from openai dashboard and add it as a environment variable in your code as it’s recommended to keep it private.
Here temperature shows the creativity of output, the more temperature is the more creative answer you will get and its not recommended for any calculation related output but its very useful for content writing.
Now we have LLM setup so let’s try it once
After running it you will get an output from LLM saying hello and now our LLM is working perfectly!
So let’s create a chain, but first we will need to create prompt template for our LLM which we can create using PromptTemplate from langchain
Here cuisine is an input from user and it will be automatically added in our prompt dynamically. so now we have our prompt and LLM ready so now we can create chain using LLMChain
Now our first chain is ready which will give us restaurant name. Now create one more chain which will give us food items list for the given restaurant name.
Now let’s combine these 2 chains using SimpleSequencialChain . The order of chains matters in sequential chains.
Once we run this code, we will get name of 10 dishes based on given cuisine and restaurant name!
But what if we want both restaurant name and dishes name in output? 🤔
This is where SequentialChain comes into picture, it allows us to have multiple inputs and outputs unlike SimpleSequentialChain . so let’s try it!
Now let’s combine both chains
After running the code, we will get both restaurant name and dishes list and this is how you can create chains using langchain according to your usecases.
🤖 What is an Agent?
Langchain Agents are the digital workhorses within the Langchain ecosystem, bringing the magic of automation to life. These agents are essentially intelligent entities, programmed to understand and respond to human language, allowing them to perform a myriad of tasks autonomously.
The main problem with most of the current LLMs is that they are trained on historical data which is limited and that’s why they don’t have information about latest data. For example if we want to know about any latest news or latest framework which just got launched or we want to know about any latest stock market related information then we can’t get it from these LLMs because they are not connected with the internet.
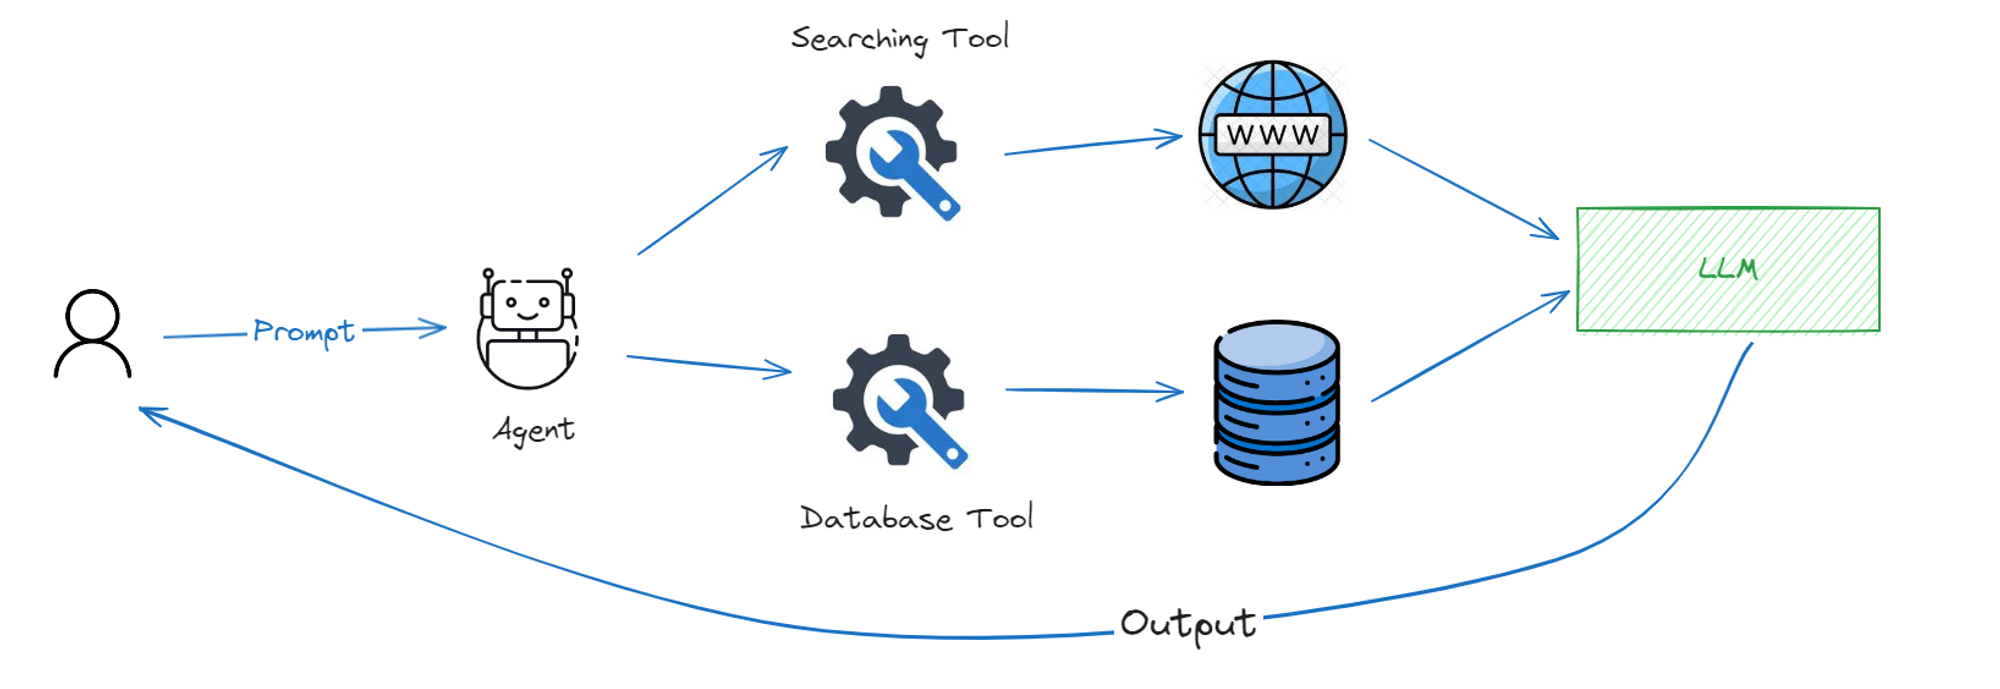
To solve this problem, langchain introduced langchain agents which can use set of tools and combine them with your existing LLM functionalities and allows your LLMs to work with latest data. For example, using wikipedia tool you can make an agent which can extract an information from wikipedia and using LLM you can format it properly or write detailed article about it. These agents can handle variety of responsibilities from organizing your schedule, managing tasks, interacting with databases and extracting information from internet. Find the list of tools provided by langchain here.
Let’s create our first agent
Now we know what agent is so let’s try to make one basic agent which can fetch information from internet and give us the latest information.
We will use serpapi tool for this scenario with our agent. First get your serpapi key from their website and once you get the api key then store it in your environment variable and let’s start building our agent.
We will load the tool using load_tools method and provide our OpenAI LLM which we created before. After that we will use initialize_agent method to initialize our agent with given tools, LLM and agent type.
And once everything is done, now we can finally run our agent by giving it prompt like this:
And it will return the current value of dollar from the internet !! 🚀
You can also create custom tools for your specific usecase and we will learn about it more when we will create our meeting management agent.
🌐 Automating meeting workflow
Let’s come back to the meeting automation scenario where we have so many meetings scheduled and you are confused to find the related person to handle or take care of the meeting depending on the company size and client idea.
For example, let’s consider this scenario:
- If company size is less than 10 or its just a startup then the meeting will be with senior developers and for that they will need a project proposal document to learn about idea and client.
- If company size is medium to high then you as a CEO will handle that meeting and you will also need a project proposal document to learn about idea and client.
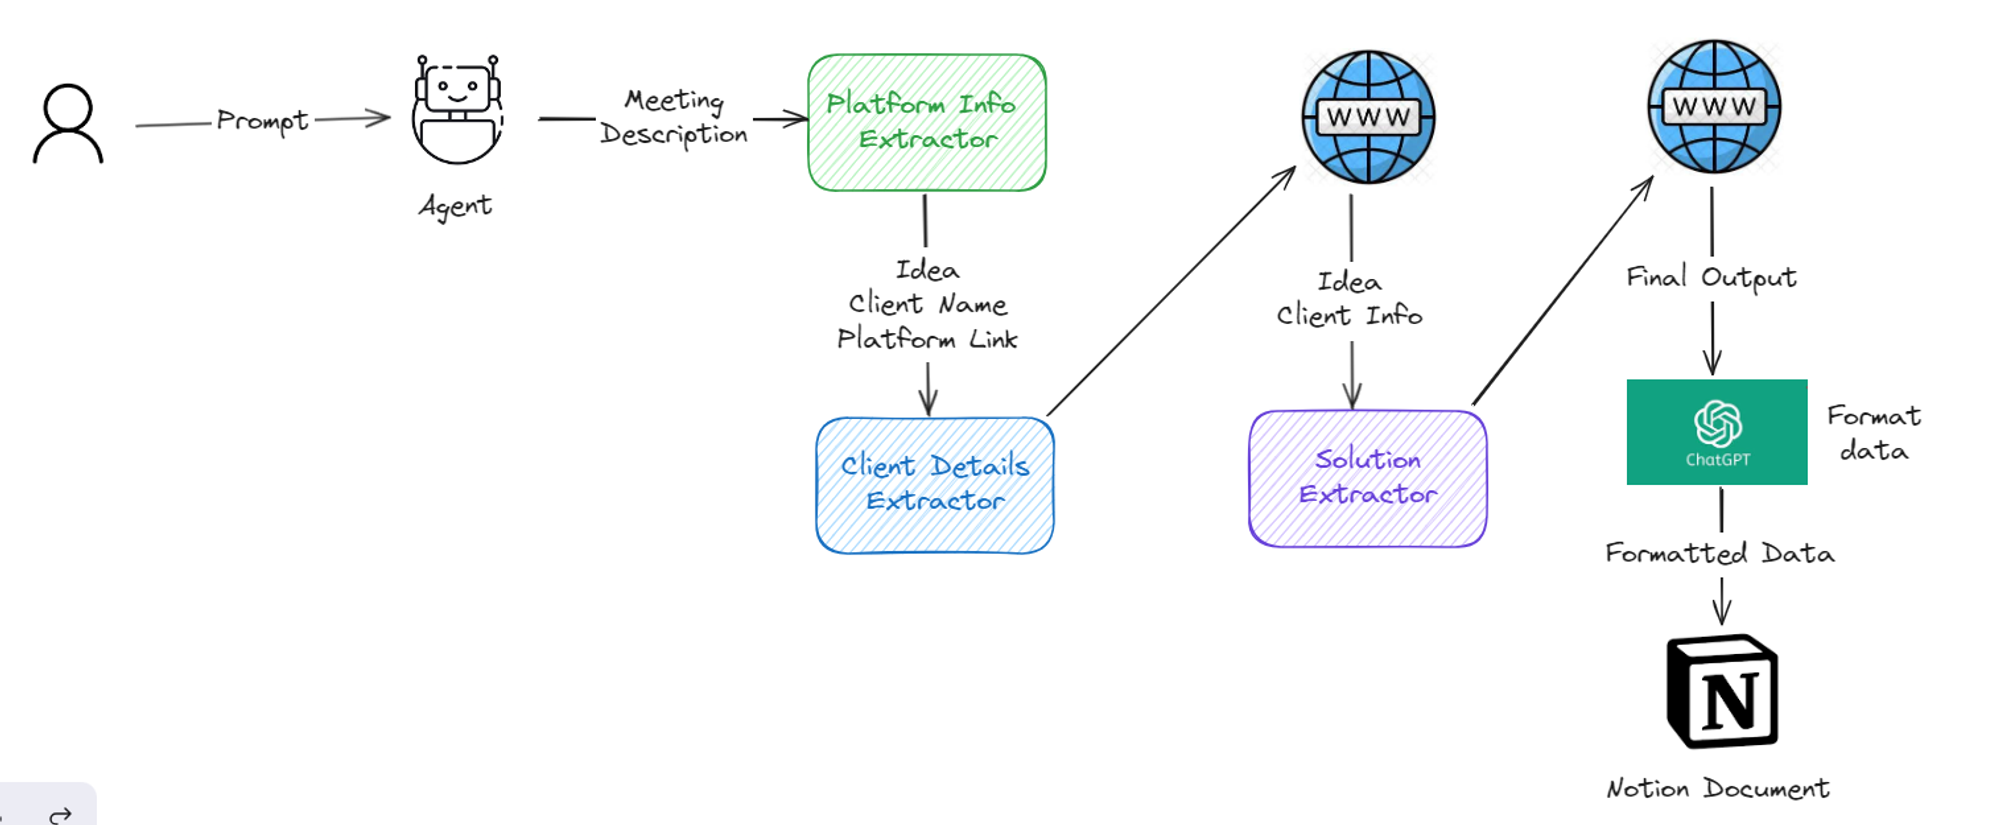
To address this issue, we will create an agent which can take meeting description as an input and then from that meeting it will find client name, idea, company name, company link and information about client, their achievements, goals and background. Once we have all the information from about client then it will use another tool to find out a possible solution for the given idea or problem. Once we have solution then we will add that all information in a notion document with good formatting.
Workflow
So basically we will create 3 custom tools for our agent here:
- Platform info extractor: It will find the idea, client name and platform link from the given meeting description
- Client details extractor: It will search on the internet to get the more information about client, idea and platform
- Solution extractor: It will take the idea and search online for the possible solution.
Once we get all the information then we will use notion API to add this information in a notion document.
Here is how the full workflow of agent will look like:
Let’s create our agent
First of all, let’s setup our LLM. we will use gpt-4 model for this example
gpt-4 is a conversational model, so it will store all previous conversations in a local memory to get the context for current message so it takes the previous messages and sends the full conversation as a context in prompt so that model can understand the context for current message but suppose if there are more than 100 messages then the context will become so much longer and it won’t fit in context window of model. That’s why we will only send last k number of conversations in context and to do that we can use ConversationBufferWindowMemory method with k parameter.
Now let’s create our first tool which is platform info extractor. To create any custom tool in langchain, you will have to create a class with following properties:
- name: name of the tool
- description: description about the tool so that agent will know when to use this tool
- _run(): this method will be triggered when agent uses the tool so add your business logic in this method
- _arun(): this method will be triggered when someone calls agent asynchronously.
- We will have to inherit properties of
BaseToolclass which comes from langchain.tools
We will use perplexity api to get the information from internet and for that we will use their online model pplx-70b-online . You can get your own api key from perplexity dashboard.
here is the code for platform info extractor tool:
Now let’s create our second tool which is client details extractor tool:
Now let’s create our last tool called solution extractor which will take the idea and give us possible solution for the given idea or problem statement
Now let’s initialize our agent and add all the tools in it.
Now it’s time to test our agent 👀 !!
After running the above code, you will be able to see the thinking and observation process of our agent and how its referring to every tool one by one and giving us information in specified format.
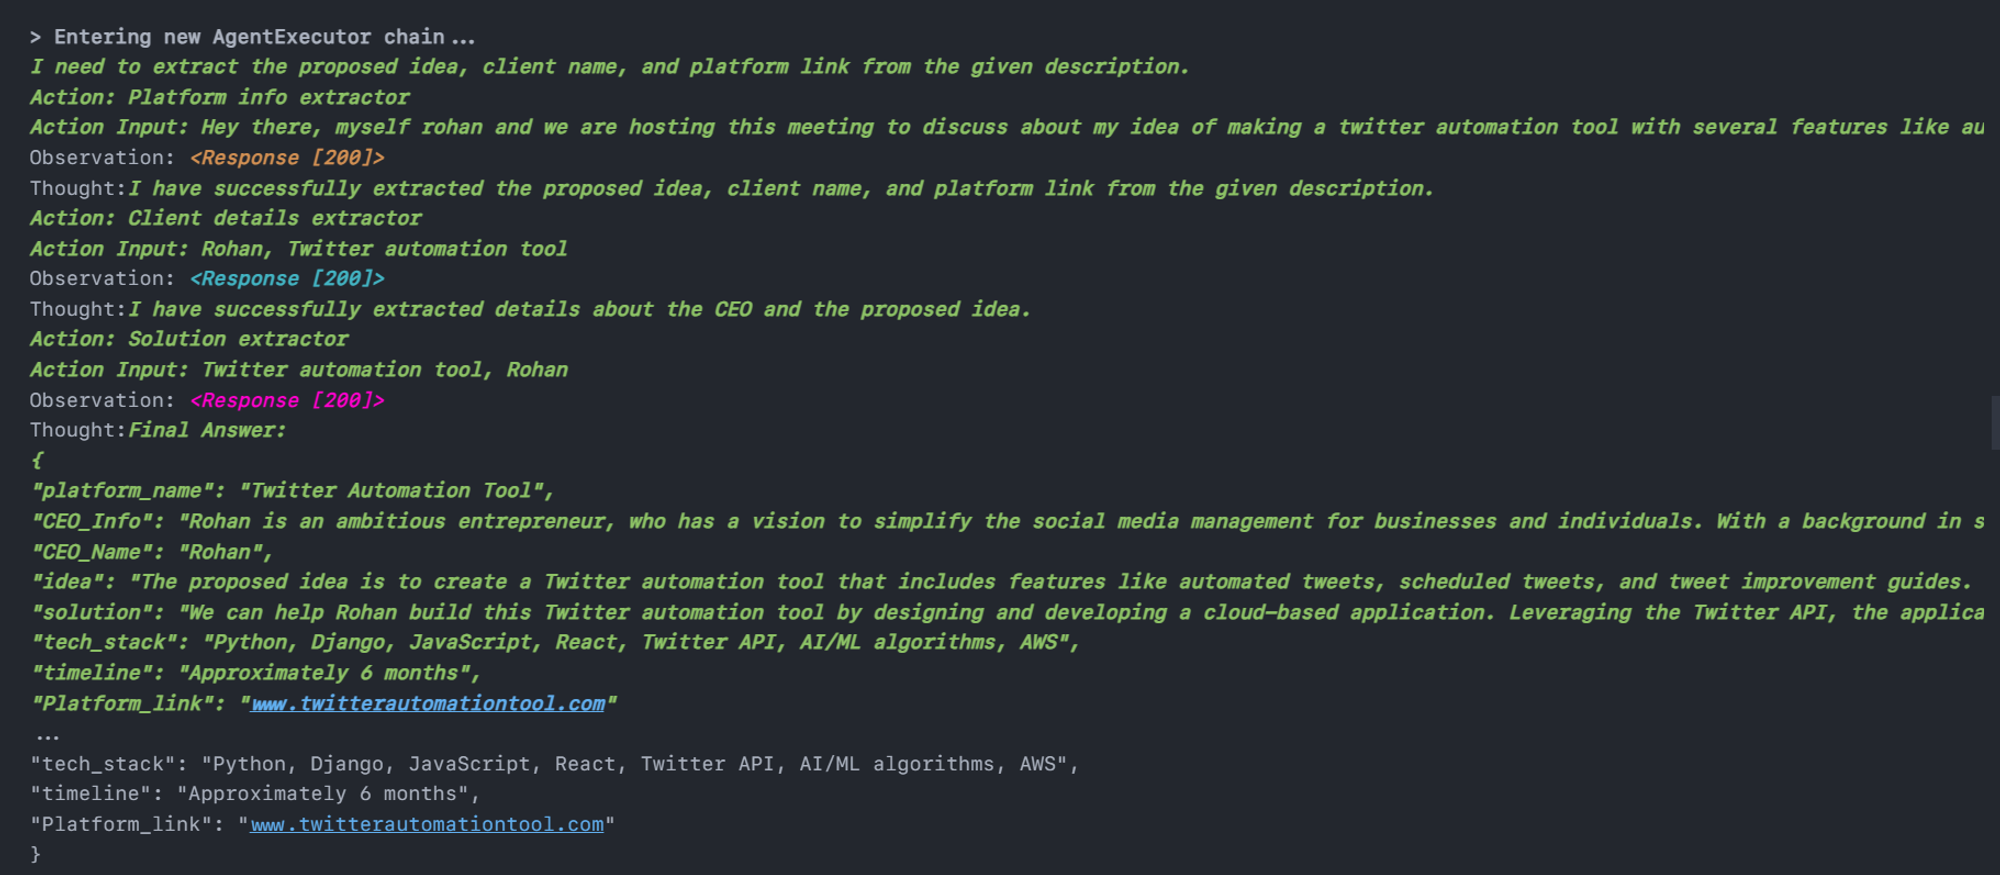
Now let’s use gpt-4 to format this details so that it can be added in notion as a project proposal (This step is optional).
Adding data to notion
Now we have all the information about client, their idea and organization, so let’s format it to make it as a project proposal and add it in notion as a notion document. we will use notion_client module from notion.
Before coding, we will first need to setup a notion integration with our workspace, first go to notion dashboard and click on create integration and add all the required information and click submit and you will get your notion API key.
After that open your notion workplace and create a empty page with any title of your choice. we will add our documents in this page so name it accordingly. Now we will need to integrate our custom integration which we just created in this page so for that click on 3 dots menu on right side in that page and go to connect to and select your custom integration name and now its successfully connected to our integration. Now we can start coding!

Start by installing the module
Initialize the client
Now we will need page_id of the page where we are going to add all these documents. To get the page id of any page, click on 3 dots icon on right side and click on copy_link and take the last string from that link.
For example if your link looks like this:
Take the 32 character long string from that link and convert it to 8-4-4-4-12 format like this below and it is your page id.
Now let’s write code to add all our data into notion document:
After running the above code, you will be able to see a newly created document with a title something like this:

And In that document, you will be able to see a well formatted project proposal which we just created using our agent!

Still the notion document is not looking like a professional project proposal, is it? 💀
Let’s try something else 🤔
Creating proposal as a word document
The main problem with notion formatting is that everything needs to be converted into notion object which you already saw above in code and you can’t write an object for every single paragraph, list or heading to make your document good so instead of using notion we will try to get an output in markdown from our agent and then convert that text into an actual word document.
Let’s change the part where we made our last openai call for formatting. Instead of getting python dictionary response, we will tell model to give response in markdown
Make these changes in your previous code:
And now we have our project proposal as a markdown text so now its time to convert it into word document and we can easily do that with pypandoc which is a python wrapper for pandoc.
Let’s install it
Now we just have to provide our markdown text and it will convert it into word document. So let’s try it out!
After running the above code, you will see a newly created file called output.docx and now we have a decent looking project proposal like this:

And now you can use this document as a reference before going to the meeting and make a good impression to get that deal 😎🤝.
💡How to get code?
You can get all the code discussed here from LLM agent for meeting automation repository.
⚒️ Challenges
Let’s discuss the challenges which I faced while making this agent 👀
Perplexity issues
The first challenge I was facing was related to perplexity API. The API was returning HTTP 400 status code error when i was trying to use perplexity using python module specified in this section. Weird. It didn’t work with OpenAI module.
To solve this issue, I then used perplexity API, after several tries and it worked. Skip the trouble & find Perplexity's official documentation here.
Getting proper response
After writing proper code and creating custom tools, i was able to get the response but the result was not that much good and the information it was returning was also not much in detail so i increased the temperature to 0.6 to make it more creative and added one more step to format the agent data using openai.
Making it professional
The last challenge was storing or creating a professional project proposal because if it doesn’t look like a proposal then what’s the purpose of it 🤷♂️.
The notion document was not looking much professional because to format content using notion api, you need to use notion objects and you have to convert everything as an object (paragraph, heading, list, code_blocks etc..) so instead of manually guessing the structure, i even tried to make the notion object for given response using an agent but the gpt-4 output limit is only 4096 characters and notion object was becoming very large ☹️.
So then i decided to get the response as a proper formatted markdown and then converted it into word document and then it looks decent.
The current code can be improved and prompts can be better too and you can play around with the it by taking the code from our github repository.
📝 Conclusion
As we've explored in this blog, the potential of Langchain and Langchain Agents is vast. By incorporating these intelligent assistants into your meeting workflows, you can streamline processes, reduce administrative overhead, and ultimately, empower your team to focus on what truly matters – driving innovation and achieving goals.
Here we only considered meeting workflow but there are so many other default tools available in langchain and you can also create different kind of tools for your specific usecase which can help you save a lot of manual work and time.
So, whether you're a small team looking to optimize your meeting routines or a large organization seeking to revolutionize your workflow, langchain agents are a very good consideration to automate your tasks with the use of Artificial Intelligence.
If you are looking to build custom AI agents to automate your workflows then kindly book a call with us and we will be happy to convert your ideas into reality.
Thanks for reading 😄

.png)


.png)

