


Introduction
We all have heard about langchain and langchain agents and how they are autonomously automating any workflows using large language models (LLMs). If you still don’t know about langchain and langchain agents then don’t worry we will cover that also in this blog. If you really want to deep dive into langchain and langchain agents then I will suggest you to first take a look at my other blog about langchain and then read this.
Langchain agents are good at following the conditional chain flow where the output of one chain depends on another and AI agents are very good at following the sequential flow but are they really autonomous? 👀 What if we have a conditional flow with so many different workflows integrated into one or we want to make our agent wait or run any specific workflow at specific time infinitely then a normal langchain agent might not perform well for this workflow.
This is where langgraph comes into picture. Langgraph is a package made by langchain team to create more flexible and conditional workflows which can be visualized as a graph. So before learning about langgraph, let’s take a quick look at graphs.
💡You can get all of the code shown in this blog from here.
What is a Graph?
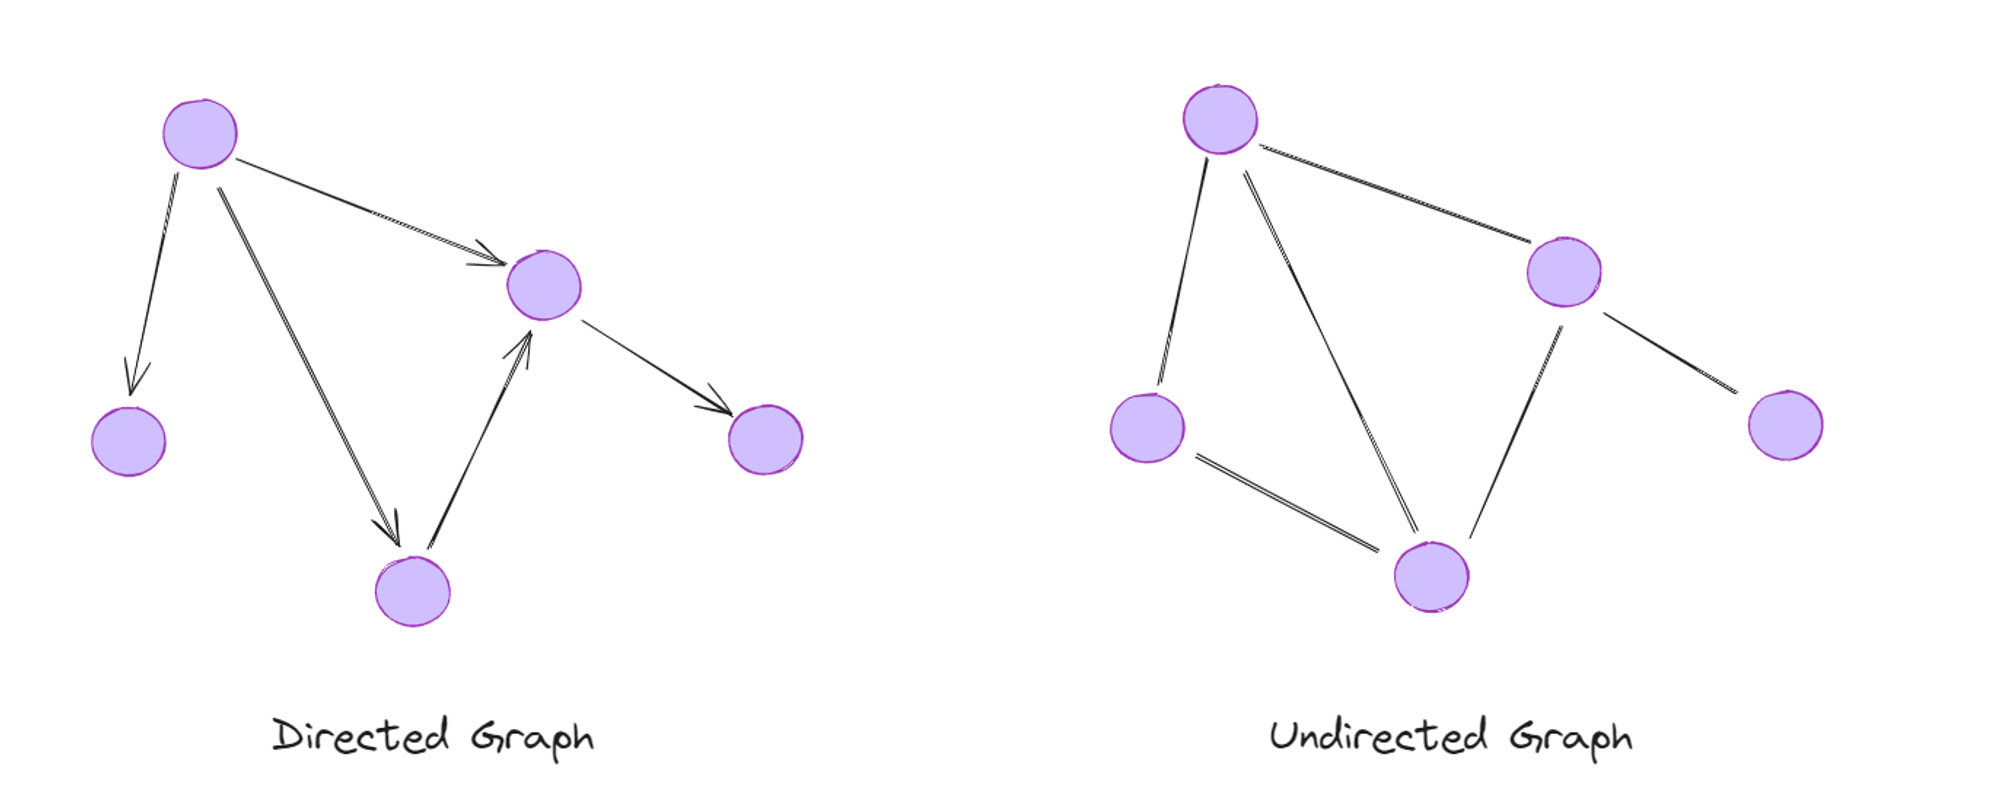
Imagine you have a bunch of data that can be represented as a network where each data or entity has a relationship with another data or entity and this relationship can be of multiple types (one-to-one, one-to-many, many-to-many etc..). There are 2 main components in a graph which are nodes and edges.
Some examples of this type of data are transportation data or social media network where every entity or user have a relation with other entity or users and this is where graphs becomes easy to visualize this type of data.
There are 2 types of graphs:
- Directed - In a directed graph, edges have a direction indicating the flow or relationship between nodes (e.g., following on social media).
- Undirected - In an undirected graph, edges have no direction and represent symmetric relationships (e.g., connection on linkedin).
What is Langgraph?
As we have discussed above, langgraph allows us to create more flexible and complex workflows for the agent runtime. The chain of actions in langchain agents is sequencial and it is good for sequential workflows but when it comes to complex workflows or multiple workflows where you have to combine every workflow and follow the conditional path then it will become hard to implement it with simple langchain agents.
You might be thinking that we can make separate tools for different workflow and then let LLM decide which tool to use using function calling, well you are right but what if there are multiple workflows ( For example, newsletter workflow, email writing workflow, cold email workflow all inside one single workflow) then you will have so many tools to consider and LLM might not decide which tool is associated with which workflow and this is where we can use langgraph.
Langgraph makes your workflow easy to visualize using graphs where each tool is a node and edge describes the relationship or chain between them (more about this later). You can also create different type of cycles in your agent workflow or create conditional workflows (for example, if we get an email then run email writer workflow but if it is a cold email reply then run cold email workflow where you research about lead).
Here is how a basic graph workflow looks like 👇
Now let’s take a look at each component of langgraph in detail 🚀
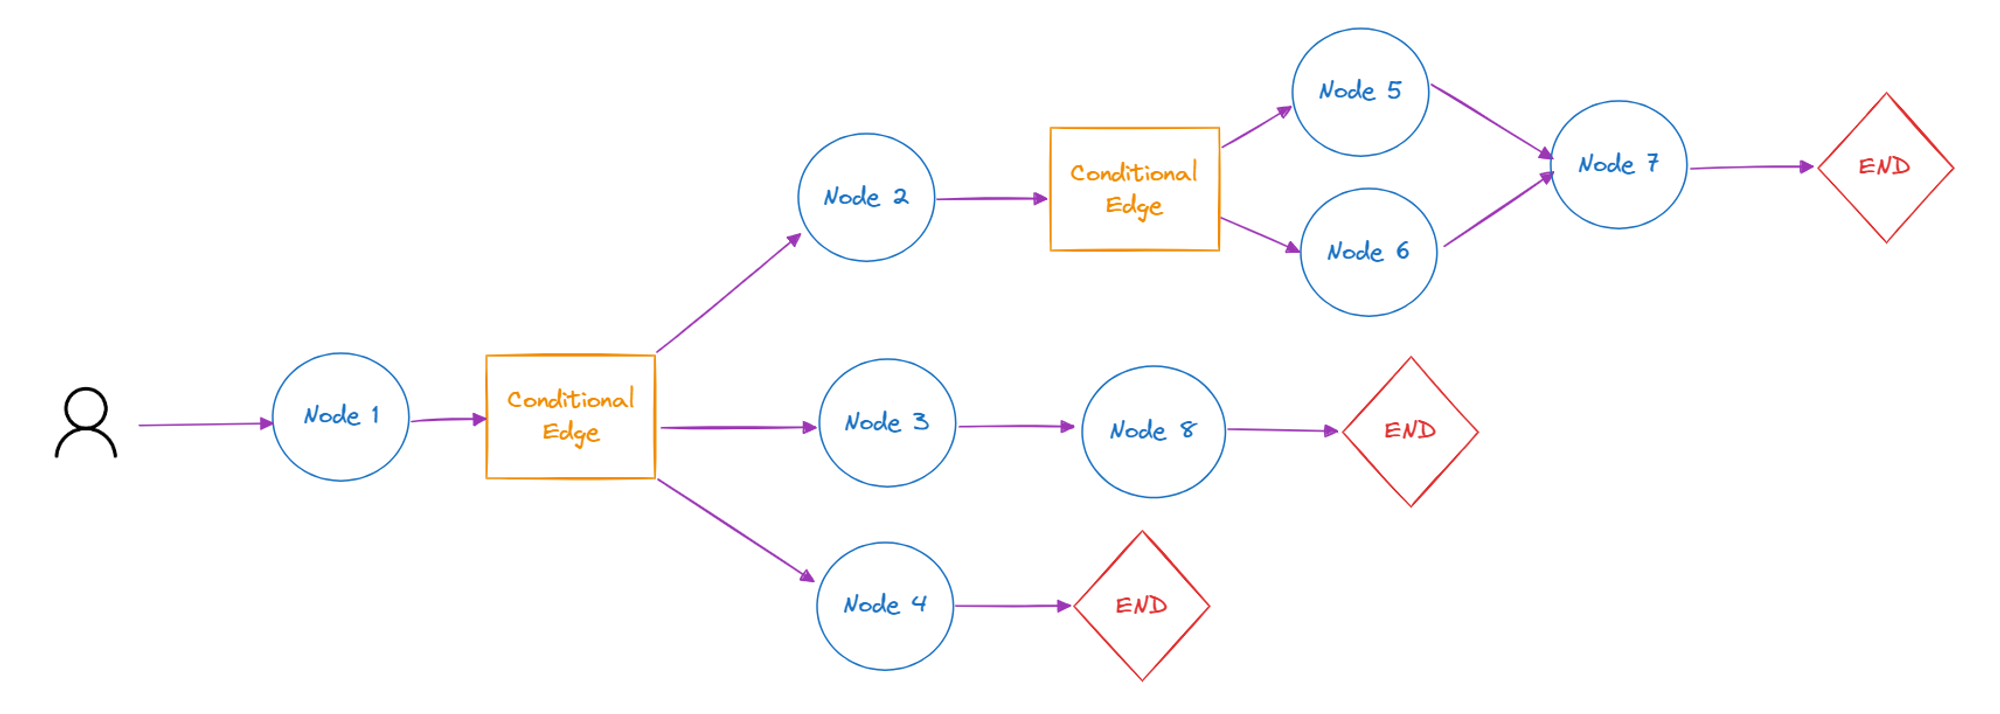
Nodes
A node can be any function or tool your agent uses in langgraph and these nodes are connected with other nodes using edges. Every workflow ends with a “END” node in langgraph which shows the end of workflow. You also need to define a starting node which will be the starting point of your workflow. Optionally, you can also define an ending node if you know the ending point of your workflow.
Let’s create 2 functions and use them as a node
Let’s create a graph and define our nodes
Now to connect these nodes, we will use edges
Edges
As you might have already guessed, edges are used to connect the nodes which we are created. There are 2 type of edges in langgraph:
1. Simple Edge: A simple edge between 2 nodes
This is how a simple edge looks like
2. Conditional Edge: This edge allows you to go to any node based on condition. It accepts one condition function and you can define the different nodes which are connected with this edge using an alias.
This is how a conditional edge looks like:
State
State is the information which can be passed between nodes in a whole graph. If you want to keep track of specific information during the workflow then you can use state.
There are 2 types of graph which you can make in langgraph:
- Basic Graph: Basic graph will only pass the output of first node to next node because it can’t contain states.
- Stateful Graph: This graph can contain state which will be passed between node and you can access this state at any node
Here is how you can define state and pass it to stateful graph:
Creating a Basic Workflow using Langgraph
Now we know about langgraph and its components then let’s create a basic workflow using langgraph. We will create one weather assistant which will give us weather information of any location.
First of all let’s install required dependencies
We will use open weather API to get information about weather information of any location. You can get your own API key from their website for free. Additionally, you will also require OpenAI API key to use their LLM.
Store your openweather and OpenAI API keys in environment variables
We will use “OpenWeatherMapAPIWrapper()” to make a call to OpenWeather API and we will use “ChatOpenAI” to use GPT-3.5 model.
We will create one node which will take user input and extract the city name from user’s query and pass it to next node where we will get the weather information using openweather wrapper
Now let’s connect these 2 nodes using edges and create a graph
Here is how our workflow will look like 👇
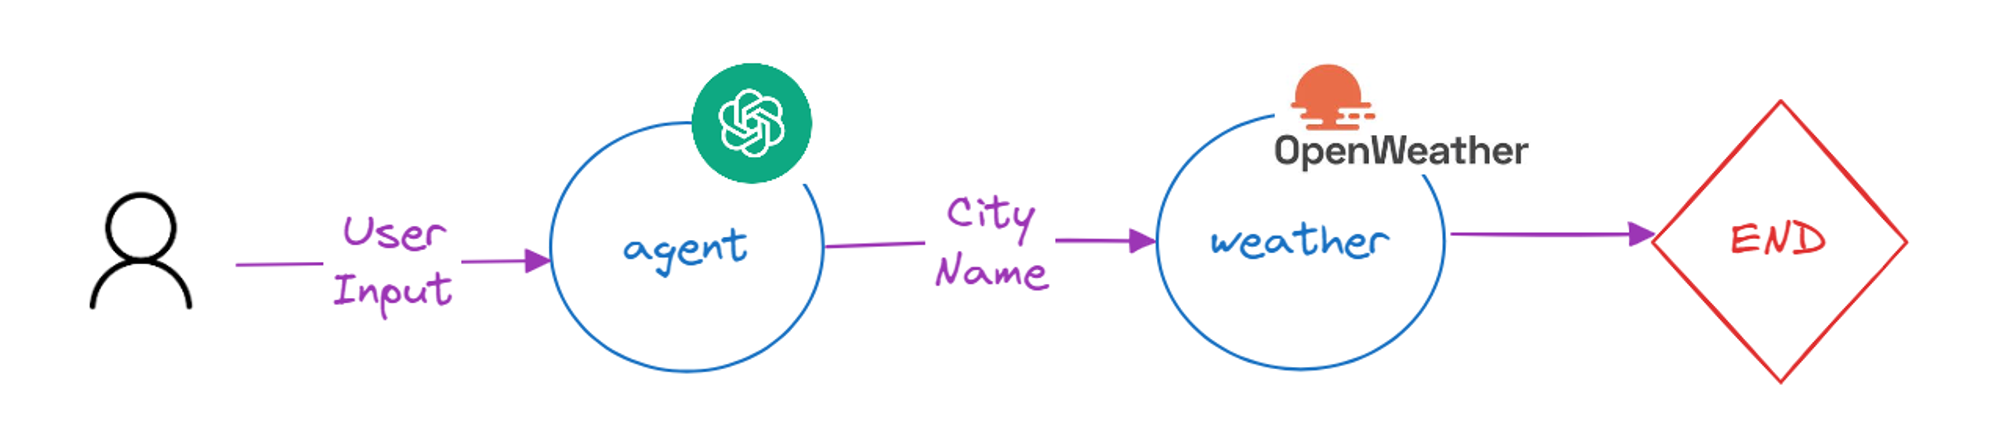
Additionally, you can define the starting and ending points of your workflow. Here we know that our input will be passed to an agent and then we will find the weather info so the starting point will be the agent node and the ending point will be the weather node.
And finally, let’s run our langgraph!
And you will get output like this
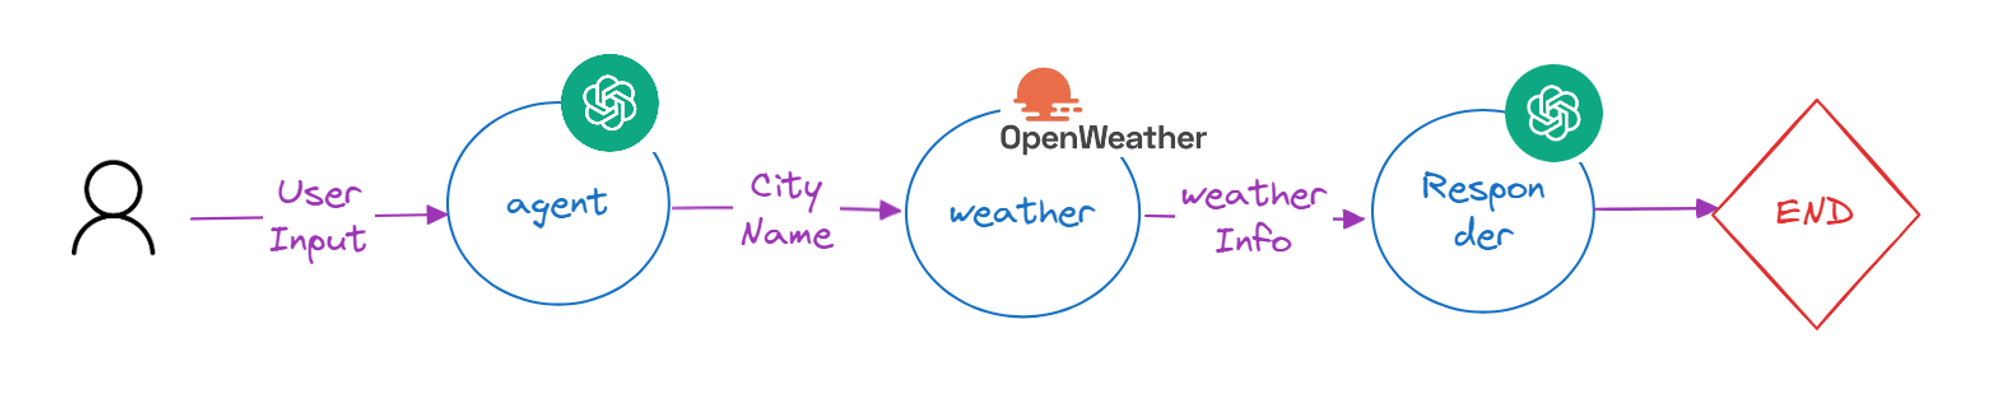
But the output is not properly readable, what if we have a responder node that will format this output properly and work as a weather agent instead of a function.
Let’s add a new node called ‘responder’ which will format the weather tool output and provide better results. But wait 🤔, we will need the user’s query to properly format our answer but we will only get the weather tool output in our node so how can we get the user’s query which we are passing to agent node? 👀
This is where states comes into picture. We will create one state called “messages” which will store all the conversation happening in the entire workflow. so let’s create it first!
And now let’s create our third node
Make sure first 2 nodes are also using state and adding their responses in messages
Finally let’s create a stateful graph as we have state to pass between nodes. Also define nodes and connect them using edges.
This is how the new workflow will look like 👇
Let’s try it with responder!
And now the agent will reply in more readable way
You can also ask specific questions like “Is there any chance of rain in delhi?” or “Is it a best weather to go on long drive in delhi?” and responder will respond accordingly.
Still there is a one problem 💀, the agent still can’t answer questions like “How are you?” because it will try to find a city name in it and if it can’t find it then weather tool will throw an error so we will have to handle this case too.
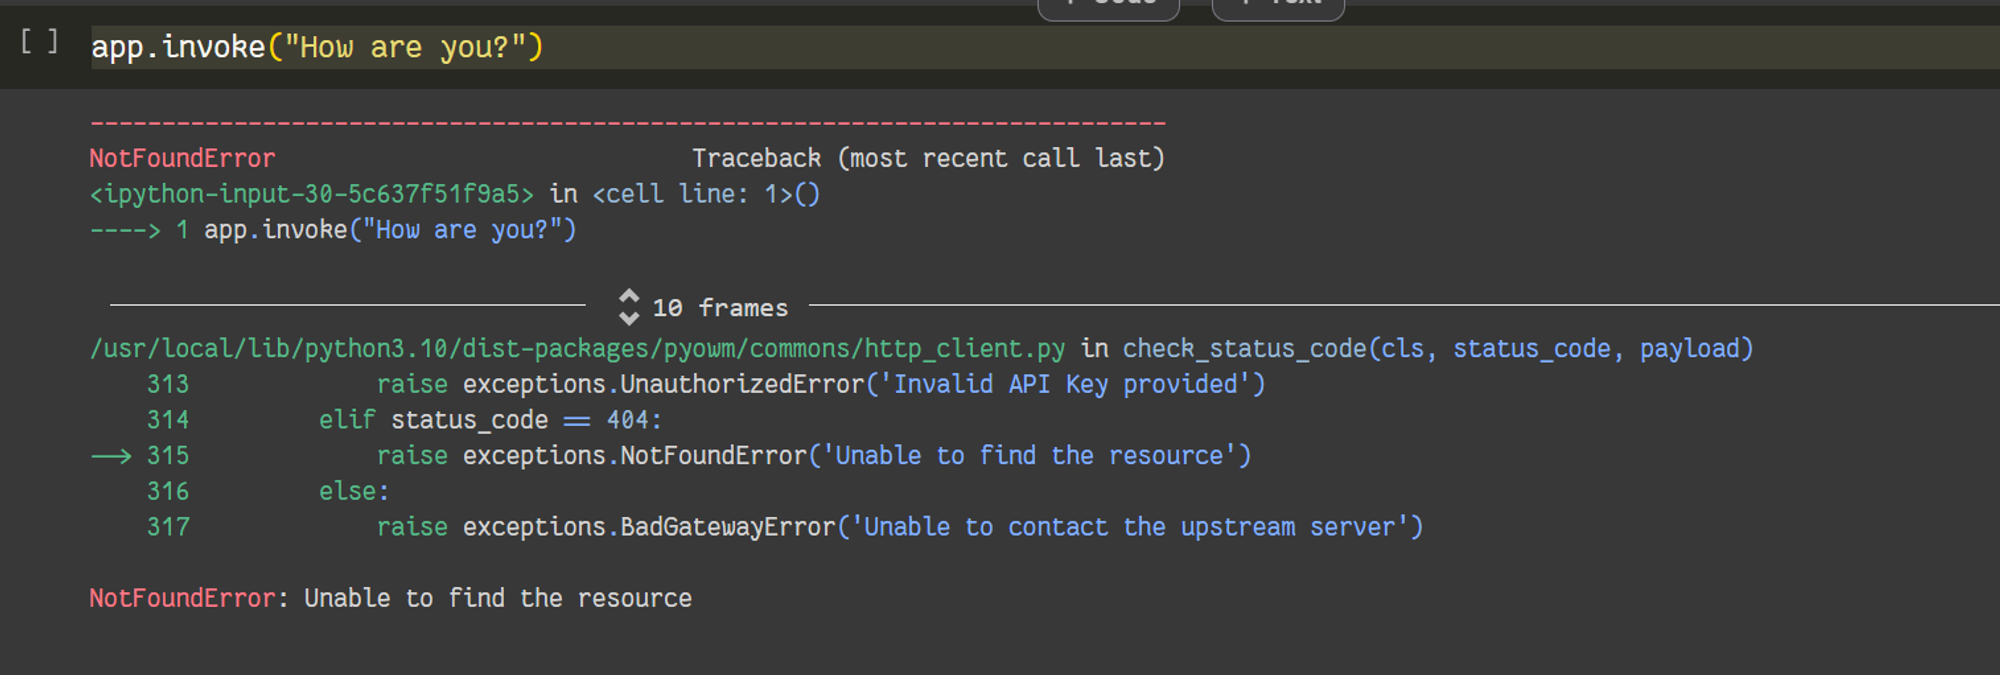
What if we run weather tool conditionally? 🤔, means we will only run that tool when user asks weather information otherwise we will not respond anything. This is where we will need to create a conditional edge so let’s create one!
We will tell our llm to response with “no_response” if it can’t find city name in user query and based on that output, we will use weather tool or end the workflow.
This is how the updated workflow will look like 👇
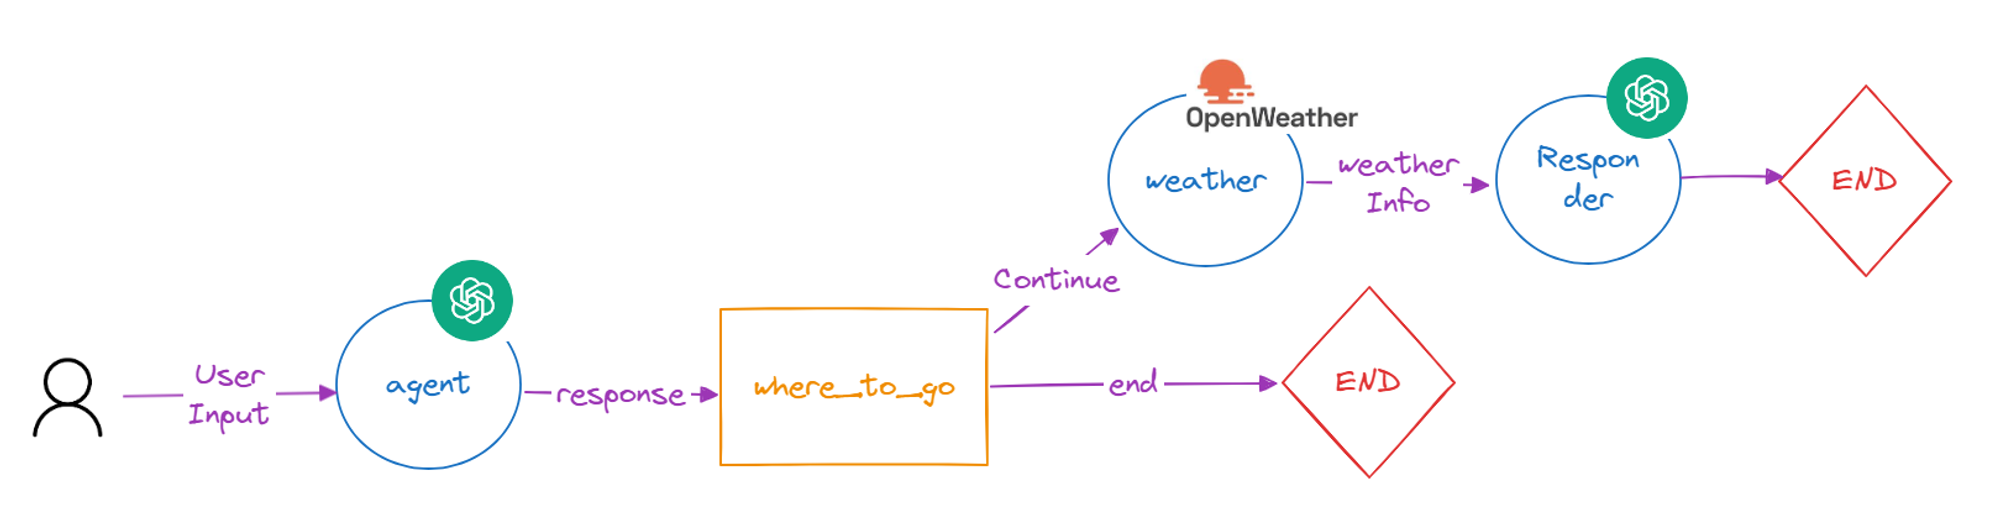
Let's write code for it
Now if we ask questions like “How are you?” then it will respond with “no_response” instead of throwing an error and if you ask questions regarding weather information then it will use weather tool and respond with responder 🚀!
💡You can get all of the code shown in this blog from here.
Now we know how to create a basic workflow using langgraph so let’s get our hand dirty by creating a multi purpose AI agent👀!
Mini Project: Let’s Create a Multi-Purpose AI Agent
Let’s create an AI agent that can give us live weather information, create draft replies for our emails or even it can chat with us normally like a chatbot. You can add more workflows in this agent but for the simplicity of this blog I am only going to add 2 workflows. So let’s get started 🚀!
Workflow
Before creating the project, let’s take a look at the workflow of our agent!
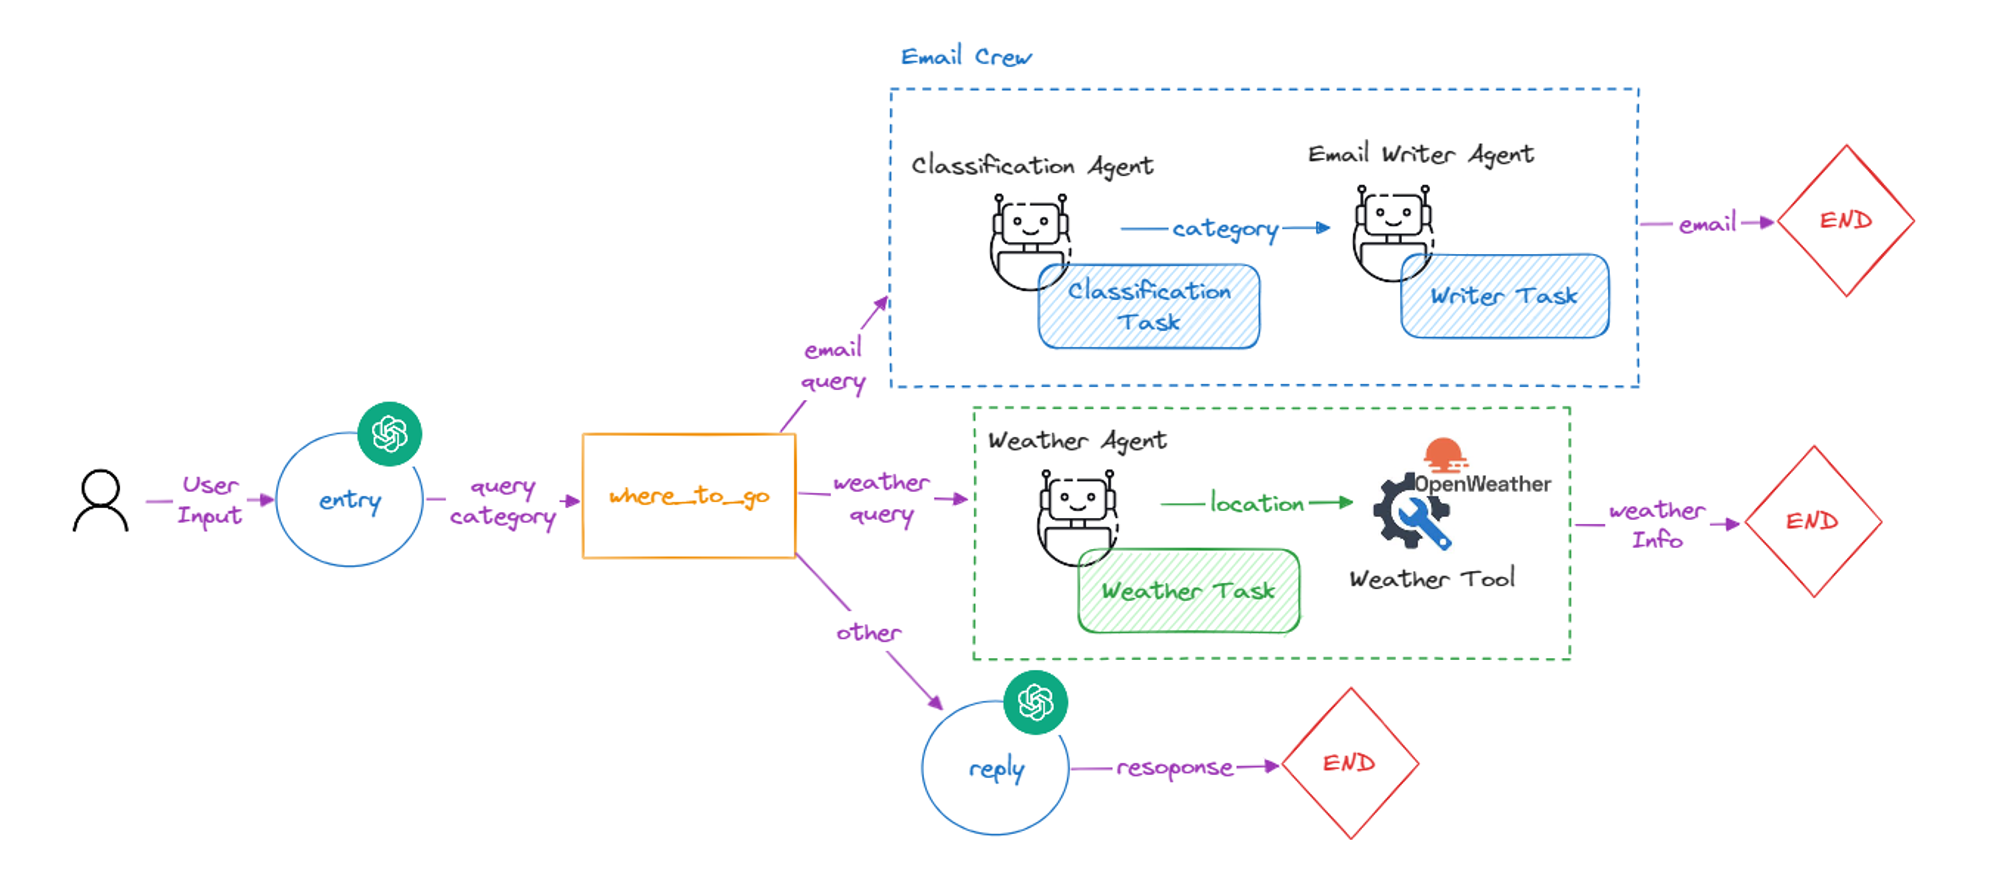
We will first add the user input in our entry node where the user input will be categorized into 3 categories:
- email_query: If user want to generate an email response to given email
- weather_query: If user want weather information about any location
- other: If user want any other information
Now based on the categories, we will redirect the query to right node. 🔂
We will use CrewAI to create a crew which can categorize the email and then based on the category it will write a response. We will also create an separate agent for weather where we will provide the openweather function as a tool and it will automatically format the final weather information response. For all other queries, we will just make a simple OpenAI call.
Prerequisites
Here are the things you will need to create this project
- OpenAI API key
- Openweather API key
- A basic knowledge about CrewAI (If you don’t know about CrewAI then I suggest you to take a look at my blog about CrewAI)
Add your API keys in environment variables
So now we have everything ready, let’s get back to coding 💻!
Let’s code it
First of all, let’s install required dependencies!
Let’s initialize ChatOpenAI and OpenweatherWrapper objects
Let’s import required packages and modules
Before creating agents or workflows, let’s first define the states which we are going to pass among nodes.
We will use these state variables in our workflow 👇
- messages: It will store the conversation history to keep track of conversation happening in workflow between agents
- email: If user want to generate a email response then entry node will extract the email body from user input and add it in this state
- query: It will store the user’s query
- category: It will store the category of user’s query ( email_query, weather_query or other )
Let’s write the code to define our states:
First let’s create our email crew which will have 2 agents: ClassifierAgent and emailWriterAgent
ClassifierAgent will classify the given email in Important or Casual Category and emailWriterAgent will generate response based on the category.
Now let’s create the tasks for these agents
Finally let’s create our email crew
Finally, let’s create a node where we will run this crew
Now let’s create our weather agent workflow 🌤️
We will create a weather tool which will use openweather wrapper to get the weather information. We will assign this tool to our weather agent.
Let’s create a task for our weather agent
Finally, create a node where we will run this agent:
Let’s create entry and reply node as well
And we have successfully created all the nodes for our workflow!
Now let’s define the condition function which will decide the conditional flow for our conditional edge based on the category
And finally let’s create the stateful graph and define our nodes in it
Let’s connect these nodes using edges
And now it’s time to test our agent 👀!
After running the above code, you will see the query got categorized as “email_query” and then using EmailCrew it will generate the reply for the extracted email which looks like this:
Ofc you can make it better with better prompts but I will leave it on you so that you can do experiment with it.
You can also try with below queries for different use cases and agent will reply differently.
And finally we have crated a multi-purpose agent which can give us weather info, categorize and replies to our emails and can even work as a simple chat bot 🚀! You can also add more nodes or crews of your choice to give it more power and make it more useful.
💡You can get all of the code shown in this blog from here.
Use Cases of Langgraph
As we already saw, langgraph can be very useful to create LLM workflows which are harder to make using normal agents as langgraph gives you more flexibility with agent runtime. There are so many possible workflows which you can make using graph as it is easy to visualize than making an agent and allows you to easily manage your code and separate node or workflow.
Let’s take a look at some use cases where you can use langgraph.
- Agents can be more autonomous: Agents can run more autonomously by adding a new idle node where agent can wait for some time or you can add a node that can be triggered on a webhook event and then it will start a workflow. This could be used to study things like traffic flow, market dynamics, or social behavior.
- Building Conversational Agents (Chatbots): LangGraph's ability to manage state and handle cycles makes it ideal for creating chatbots that can hold conversations that flow back and forth. The graph can track conversation history and use it to inform future responses, making the interaction more natural.
- Workflow Automation: LangGraph can automate complex workflows that involve multiple steps and decision points. By defining the steps as nodes in the graph and the decision logic as edges, LangGraph can handle complex tasks easily. Langgraph can also make complex RAG systems easy to visualize and implement.
- Real-time Decision Making: LangGraph's cyclic nature allows for continuous evaluation and decision making. This could be beneficial for applications like fraud detection systems that need to analyze data streams in real-time and make immediate decisions.
Conclusion
As we discussed in blog, it became very easy to automate large and complex workflows with the use of langgraph as it allows you to visualize your entire architecture as a graph and you can focus in individual workflows and integrate them together. The decision making system gives you more flexibility for reasoning and accuracy.
By understanding its core concepts like nodes, state management, and conditional edges, you can leverage LangGraph's capabilities to create innovative projects. Remember to focus on cyclic workflows where LangGraph shines, and ensure your graphs have well-defined paths to avoid dead ends. With practice, LangGraph can become a valuable tool in your LLM development journey.
Want to Know How AI Automation can Help Your Business?
Whether you are a small business or a big industry, AI agents are performing and improving well to automate your all kind of business workflows. Do you have a business workflow which can be automated using AI agents or do you have an idea which can be a next business idea in AI Automation industry then feel free to book a call with us and we will be more than happy to convert your ideas into reality.
Thanks for reading 😄.


.png)